Thursday, June 26, 2014

Artful Box

Hi All,

Today over at A Vintage Journey we are challenged by Nikki to "use every stamp in a set"  I decided on Tim's Artful Tools set from Stamper Anonymous.  I don't know about you but when I get going on a project I start setting my tools down where I finish with them.  Before I know it - I can't find anything.  I am forever looking all around my work table and lifting each piece of paper to find what I want.   I decided to try to change my ways and work a little more efficiently by containing my small tools in a box that can sit on my work table while I'm creating.


When not in use the Artful Box doesn't take up much space but can easily be opened and remain open because I made it with a hinged lid.  Sort a like an easel card.


I cut a small notch in each side of the box edge to hold the lid open.  That makes it easy to take tools in and out and hopefully not lose them.
 
I used Tim's craft resist paper to cover the entire thing being careful to center the large butterfly in the center of the inside.  


I used an old Reader Digest cover, cutting the front cover in half to make the hinge. I rather liked the nice forest green color so left that as the edge.


I stamped the front panel and then added it to the front leaving a space for the movement of the lid.  It is held together by the papers on both sides.


I did a little more stamping and then finished the cover, front and back.


I next constructed the box, covered it with paper that I stamped, sanded the edges and distressed with Gathered Twigs Distress Ink.  I then put the box and lid together and I was done.  Now I just have to find my small tools to put in it so I can start my next project.  Wish me luck.
 
 
Hope you have enjoyed - I'll let you know if it works.
 
Have a fabulous weekend,
S@ndy


Wednesday, June 18, 2014

June Tag

Hi All,

Just a quick post today to get in on the challenge over at Tim's blog.  This month we used a water color technique that was fun and fast.  It is a watercolor blending background where we put the Distress Ink on the back of a stencil, spritzed it with water and then put it on watercolor paper.  You can see Tim's tag and his tutorial here.  He used the star stencil but I wanted to go my own way, as usual, and went with hearts.

 
After the background was dry, I used some stamps from Tim's collections, stamped in black and embossed with clear.  I stamped the heart twice, cut them out and put the arrow in the center of the top heart.  I colored some Crinkle Ribbon as Tim did, added it to the top and I was good to go.
 
Have a wonderful and creative day,

Monday, June 16, 2014

Karen's Challenge for June

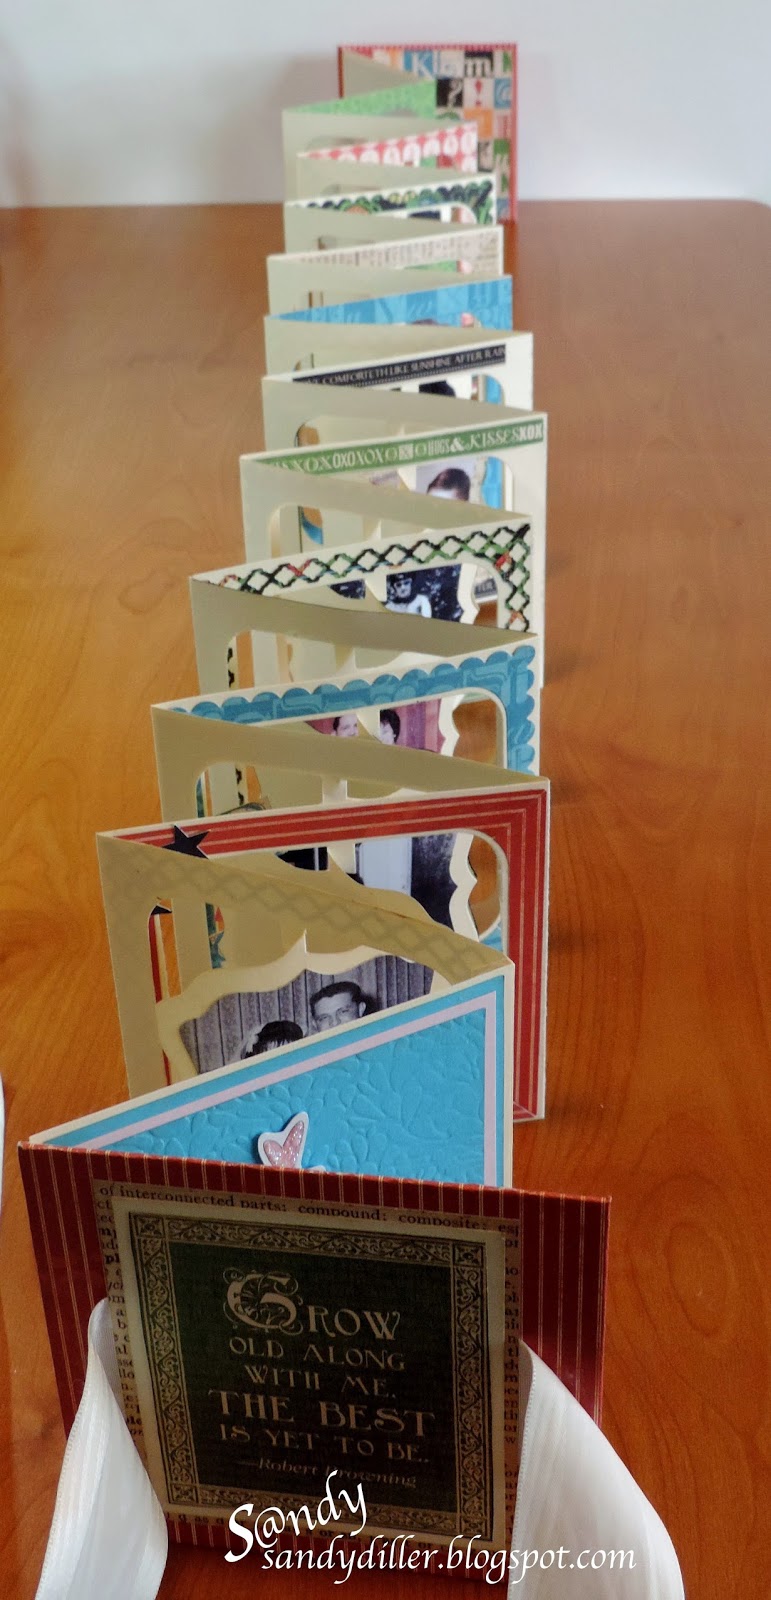
Hi all and welcome - this month Karen Burniston told us we could use any of  her dies for our projects.  Her only request was that we use a photo.  I used the Accordion Fancy Label Die #771 from Elizabeth Craft Designs.   I took her request to the max this time.  Since this challenge falls at the same time as our anniversary of 50 years I decided an album was in order.  Ok, I promise this is my last anniversary post but hope you will enjoy this little stole down Memory Lane. 


I used the Ty-pog-ra-phy Paper Pad from Graphic 45.  Among the papers I found this fabulous quote by Robert Browning that is so appropriate.  This is a nice little book full of photos of our family as they grew up and we grew older (not old).  When you open it, the best is yet to be.


I had a Lazy Susan that fit the book perfectly when opened.  I think it looks like a star book and makes a nice display.  You can move the pages around to see the photos  easily and it is contained. 


When the ribbon is untied and the book is not contained by the Lazy Susan - it looks like this.

I've had this idea for quite some time but until now it has not made its way to paper.  It's kinda like having a song stuck in your head.


Here are a few photos of it along the way- I started with 20 panels from the die and a solid panel for each end.  Then two chipboard panels for the covers.


After connecting all the panels together and while flat, I decorated each one like a scrapbook page.  After decorating them, I connected all the inner panels together as per the instructions for making any other card (a very long card).

I'm off the see what the other DT members made this month - hope you have enjoyed.

Have a great week,
S@ndy

Friday, June 13, 2014

And They Said It Wouldn't Last!!!

Hi My Blogger Friends,

Today Mac and I are celebrating our 50th wedding anniversary.  I doesn't seem possible but it's true.  Where does the time go?  It certainly doesn't seem like that long ago but when I look at the photos - we looked like such babies on our wedding day.  I made this memory box to share with you and bring back those fond memories of a day so long ago.


I have been working on this for some time now and must confess that it sat idle while I looked high and low for the wedding album.  I dug around in an old trunk where I keep stuff like this, the album wasn't there but the cake topper was!  It looks rather beat up and has turned yellow over time.  I guess that's to be expected after laying around in a trunk for 50 years.  I tried to make the entire thing look vintage, as we do now, and used the album photos that are in black and white.  Anyway there you have it.

I don't have a tutorial for you today but thought I would show in more detail some of the things that I incorporated.


On the right side, I filled a corked vile with rice then added a heart shaped pin.  Just above that, I put a pair of rings on one of the leaves.


Along the top I put our wedding year in typewriter keys, no computers in those days, and then the month and day.  The day 13 is a rub on that I placed on a dismantled watch.


Along the bottom I put the current year in computer keys that I took from an old keyboard.  Although it says "End" under the #1, it is nowhere near the end.

Thanks for strolling down Memory Lane with me today.  I will be back on Monday to share my project for Karen Burniston's monthly challenge.

Have a wonderful weekend,
S@ndy

Thursday, June 12, 2014

Wings & Things

Hi All

I am honored this fortnight to host the new challenge over at A Vintage Journey.  My theme is Wings & Things, featuring those little creatures that grace us with their presents in spring and summer.  The challenge is Tim inspired, as always, and includes birds, butterflies and bees so hope you will join the fun.  I am sharing this candlestick that features a bird from Tim's product line as well as some of his Remnant Rubs, the Birdcage and Bookplate.


This is the smallest of a set of three which all feature Tim Holtz products and techniques.  I don't have a tutorial to share this time but will tell you that the way I got the (white) weathered look was by spreading molding paste on the painted surface and then wiping it off with an old gift card.  When the molding paste was dry I rubbed ink on it.  Here are a few  more pictures if you care to have a look.


I've used all kinds of Tim's Goodies on these and I'm pretty happy with the results.

 
Here you'll see that I used stencils on the tall one and added some Remnant Rubs on the center one.  I placed the Remnant Rubs on the block and rubbed them randomly leaving pats of words and phrases.  More Remnant Rubs on the small one, one of those winged things.


Stencils, stamps and more Remnant Rubs add to these last two sides.

 
Hope you have enjoyed and are inspired to join our challenge at A Vintage Journey.  I would love to see what you make.
 

Friday, June 6, 2014

Love the Red, White and Blue

Hi all my blogger friends,

I am just under the wire on this entry for Compendium of Curiosities Challenge 3 but that's not unusual for me.  The challenge for this time is Tim's Faux Tea Roses.  I also think this little guy could fit in with the Country View Challenge this month - 'Only Men Allowed'.  The timing is good since it is between Memorial Day and the 4th of July so I thought I would make something patriotic.


Well, here you have my Uncle Sam/Umbrella Man holding the US Flag with Mini Tea Roses at his feet.  Since we are not suppose to reveal the technique for the tea roses all I will say is that I did not use the entire die cut for the mini roses.  You will have to order Tim's book to get all the instructions.


Once I had the idea for what I wanted to make it was pretty simple and I completed it in a few hours.  I had the container in my stash (a 49 cent find at my local thrift store).  I covered it in red and trimmed the lid with ribbon.  I made a large rosette from red and white striped paper using my Stampin Up Die.


Next I cut out several Umbrella Man die cuts using Tim's Umbrella Man Die, cut off the Umbrella (to be replaced with the flag from the Mini Old Glory Set) and stacked and glued them together.  When the glue was dry I covered the stack with the paper I wanted on the outside.  Blue for the coat and white for the pants.


I then added red strips on the pants using my Barn Door Distress Marker.  I painted some tooth picks with White Distress paint. cut out some small stars.  I glued the stars to the tooth pick and then covered them with Distress Glitter.  I added some Distress Glitter on the edges of the roses and I was ready to glue everything together.


Hope you enjoy and have a crafty day and/or weekend,
S@ndy

Thursday, June 5, 2014

Tag Friday @ A Vintage Journey

Hello and welcome to another Tag Friday -

The Creative Guides over at A Vintage Journey are showing some pretty cool tags today so you may want to stop by & see them.

Summer travel seems to be on the minds of lots of folks so I went with Road Trip.  Tim Holtz made it so easy for me with his Road Trip Stamp set.  I already had some tags hanging around so I chose one and put my tag together in a short time.


For my background I used Mustard Seed, Rusty Hinge and Peeled Paint Distress Paint.
Edged with Gathered Twigs and then threw in some Tumbled Glass Distress Inks.


I used the images from the stamp set, stamped with black (the gas pump & attendant are stamped in Gathered Twigs) & embossed with clear embossing powder. 


I stamped the car on silver paper then cut it out and popped it up with pop dots.  I made the gas gauge with my electronic cutter and added the Game Spinner.  I decided to make this tag with the hole on the bottom so I could hang some gears. All the products that I used can be found at our lovely sponsor, Country View Crafts, site. 
To shop click here.